
Home > Setup, Safety, and Repairs > Power and Extension Cords > How to Design the Electrical Layout for a Large Outdoor Holiday Display
How to Design the Electrical Layout for a Large Outdoor Holiday Display
Design a safe electrical layout for large outdoor holiday displays with power zones, circuit planning, extension cord routing, and weatherproofing tips.
By Frank "Frosty" Adminei
7/7/202617 min read
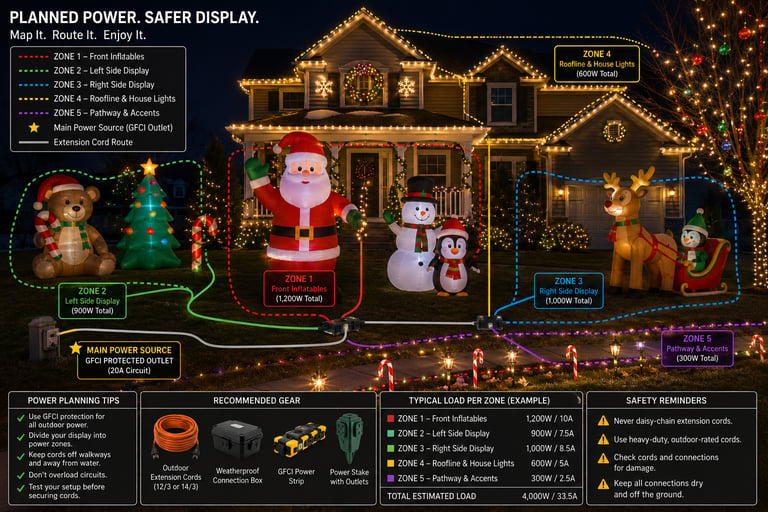
Table of Contents
Introduction
Many holiday decorators gradually grow their displays over several years. What begins with a single inflatable and a few strings of lights often turns into dozens of decorations spread across the front yard, roofline, walkways, trees, and landscaping.
Unfortunately, the electrical system often grows in exactly the opposite way.
Instead of being planned, it evolves one extension cord at a time.
A new inflatable gets plugged into the closest outlet. Another timer is added wherever there's room. A splitter solves this year's problem, only to create next year's. Before long, the yard contains a maze of cords that is difficult to troubleshoot, inconvenient to maintain, and harder to expand safely.
The good news is that you don't need to be an electrician to build a much better system.
The key is to think about your display as an electrical layout instead of a collection of individual decorations.
This guide will walk you through a practical planning process used by experienced decorators to organize power zones, estimate electrical demand, route extension cords intelligently, and leave room for future growth. Rather than focusing on specific products, we'll concentrate on building a logical system that works for Christmas, Halloween, Easter, patriotic holidays, birthdays, and virtually any seasonal display.
Who This Guide Is For
This guide is designed for readers who:
Have more than a few outdoor decorations
Use multiple inflatables or combinations of lights and inflatables
Want cleaner, safer extension cord routing
Frequently add new decorations each season
Are tired of overloaded outlets or confusing cord layouts
Want to expand their display over the next several years
Prefer planning once instead of rebuilding their electrical setup every holiday
Whether your display fills one corner of the yard or stretches across your entire property, a thoughtful electrical plan can save time, reduce frustration, and make decorating much more enjoyable.
Why Planning Your Electrical Layout Matters
Many decorating problems blamed on "bad extension cords" or "cheap inflatables" actually begin much earlier—during the planning stage.
Consider these common situations:
Three inflatables are connected to the same outlet while another outdoor receptacle sits unused.
Long extension cords zigzag across the yard because decorations were placed before power was considered.
Timers are hidden behind large inflatables, making them difficult to reach after setup.
Plug connections end up lying directly in wet grass because no weatherproof connection point was planned.
Every new decoration requires another splitter because there was no allowance for future expansion.
None of these issues necessarily require buying more equipment. Instead, they are symptoms of an electrical layout that developed organically rather than intentionally.
A simple sketch, a few basic calculations, and a zone-based approach can dramatically improve safety, simplify troubleshooting, and make annual setup faster. You'll also know where to spend money strategically—whether that's on a heavier-duty extension cord, an additional outdoor outlet, or a better way to organize power distribution.
As your display grows, this planning process becomes even more valuable because every new decoration can fit into an existing electrical strategy instead of creating another temporary solution.
Start With Your Display Plan, Not Your Extension Cords
One of the most common mistakes decorators make is shopping for extension cords before deciding exactly where everything will go.
That often leads to cords that are too short, unnecessarily long, or routed through awkward areas that create trip hazards and maintenance headaches.
Instead, start with a simple property sketch. It doesn't need to be artistic—just accurate enough to capture the important features of your display area.
Include:
The outline of your home
Existing outdoor receptacles
GFCI outlets
Walkways and driveways
Trees and landscaping
Porch areas
Mailbox decorations
Planned inflatable locations
Roofline lighting
Projectors or landscape lighting
Areas that stay wet after rain
Next, place every planned decoration on the sketch before thinking about power.
This simple exercise often reveals opportunities to group decorations more efficiently or relocate items slightly to shorten cord runs and reduce clutter.
For example, moving two inflatables ten feet closer together may allow them to share one well-planned power zone instead of requiring two long extension cords from opposite sides of the house.
It also helps identify potential challenges early, such as a favorite display location that has no nearby power source or a walkway that would otherwise require several cords to cross.
By the time your sketch is complete, you should have a visual map of both your decorations and the electrical infrastructure needed to support them.
Divide the Display Into Electrical Zones
Once your display is mapped, the next step is to divide it into logical electrical zones.
This is one of the biggest differences between a professionally organized setup and one that grows randomly over time.
Instead of thinking about every decoration individually, think in groups that can share a common power source and maintenance area.
A typical large residential display might include zones such as:
Front porch
Left side of the lawn
Center display
Right lawn
Roofline lighting
Driveway decorations
Walkway lighting
Landscape trees and shrubs
Mailbox display
Projection or spotlight area
Each zone should ideally have:
A primary power source
A planned extension cord route
A manageable electrical load
Weather-protected plug connections
Easy access for maintenance
This approach offers several advantages.
If one zone develops a problem, you can isolate and troubleshoot that area without affecting the rest of the display. It also makes setup and teardown much more organized because you're working one section at a time rather than managing cords that run throughout the entire yard.
Estimate Your Power Requirements Before Buying Anything
Once you've divided your display into zones, it's time to determine how much electricity each zone will actually use.
This step is where many decorators make assumptions that eventually lead to nuisance breaker trips, overloaded extension cords, or disappointing expansion plans.
Fortunately, estimating power isn't difficult.
Most modern decorations include a label showing either:
Watts
Amps
Voltage
If only amperage is listed, you can estimate wattage by multiplying amps by 120 volts.
You don't need laboratory precision. A realistic estimate is far better than guessing.
For each electrical zone on your layout sketch, create a simple list.
Example:
Center Lawn Zone
8-foot inflatable snowman – 85 watts
Two LED spotlights – 20 watts
Animated penguin – 70 watts
Pathway lights – 35 watts
Estimated Zone Total:
210 watts
Repeat this process for every zone before purchasing additional extension cords or accessories.
Doing this on paper often reveals that one section of the yard uses very little power while another contains nearly everything.
Don't Forget Small Loads
Decorators often remember the large inflatables while overlooking smaller devices that still consume electricity.
Examples include:
Timers
Smart plugs
Landscape spotlights
Projection lights
Controllers
Small animated figures
Musical decorations
Individually these loads are usually modest, but together they can noticeably increase the electrical demand of a busy zone.
Measure Instead of Guessing
If you're expanding an existing display, this is an excellent time to measure actual power usage instead of relying solely on manufacturer labels.
A plug-in watt meter lets you determine how much electricity a decoration—or even an entire group of decorations—uses under real operating conditions.
This is one of the few products worth mentioning in a planning guide because it improves every future purchasing decision.
If you're unsure how much power your existing decorations consume, a Kill-A-Watt style meter can provide real measurements before you redesign your layout.
For readers interested in comparing models, see "How Many Inflatables Can One Circuit Handle?" and "LED vs Incandescent Holiday Decoration Costs: What Decorations Need to Know," which explain how these measurements affect circuit planning and seasonal operating costs.
Think in Available Capacity
Instead of asking:
"Can I plug this in?"
Ask:
"How much unused capacity does this zone still have?"
That subtle change encourages planning instead of reacting.
For example:
Zone A
Current Load:
350 watts
Estimated Available Capacity:
Plenty of room for another inflatable or additional lighting.
Zone B
Current Load:
1,200 watts
Expansion should be planned carefully before adding anything else.
Thinking in terms of remaining capacity makes next year's decorating much easier because you'll already know where new decorations belong.
Match Each Zone to the Right Circuit
One of the biggest misconceptions among homeowners is that every outdoor outlet has its own electrical circuit.
In reality, multiple outdoor receptacles often share the same breaker.
Your front porch outlet, garage outlet, and backyard receptacle may all be powered by a single 15- or 20-amp circuit.
If you don't know which outlets share a breaker, your carefully planned display zones may still overload one circuit while another remains almost unused.
Identify Which Outlets Share a Breaker
An easy way to begin mapping your home's electrical system is to:
Turn on a lamp or plug-in tester.
Switch off one breaker.
Note which outdoor outlets lose power.
Label those outlets on your property sketch.
Repeat until every outdoor receptacle has been identified.
This only needs to be done once and becomes valuable every holiday season.
Many experienced decorators even keep a laminated property map with outlet locations and breaker numbers.
Don't Assume Distance Means Different Circuits
Two outlets on opposite ends of the house may share one breaker.
Meanwhile, two outlets only a few feet apart may belong to different circuits.
Without checking, appearances can be misleading.
Knowing your breaker layout allows you to distribute electrical zones intelligently instead of accidentally stacking heavy loads onto one circuit.
Spread High-Demand Decorations Across Circuits
Suppose your display includes:
Six inflatables
Roofline lights
Two projection lights
Landscape lighting
Animated decorations
Instead of placing everything on one convenient outlet, spread larger electrical loads across multiple available circuits whenever practical.
This balanced approach reduces nuisance breaker trips and leaves capacity for future additions.
If you're unsure how much equipment one circuit should support, be sure to read "How to Power Multiple Outdoor Inflatables Safely Without Overloading Your Circuit" and "How Many Inflatables Can One Circuit Handle?", where those calculations are covered in much greater detail.
Know When Your Home Has Become the Limiting Factor
Sometimes the problem isn't your extension cords.
It's simply that your home's existing outdoor electrical system has reached its practical limit.
Signs include:
Constant breaker trips
Multiple heavy extension cords converging on one outlet
Very long cord runs to reach distant decorations
Running cords through windows or doors
Needing several splitters just to add one decoration
When this happens, the safest long-term solution may be adding another properly installed outdoor receptacle rather than continuing to build around existing limitations.
Plan Your Extension Cord Routes
Most decorating guides spend a great deal of time discussing extension cord gauge.
Very few explain something equally important:
Where those cords should actually go.
Thoughtful routing improves safety, simplifies setup, and often allows you to use shorter cords.
Start With the Shortest Practical Route
Electricity doesn't care whether a cord follows the edge of a flower bed or cuts diagonally across the lawn.
People do.
Whenever possible, route cords along natural landscape edges such as:
Foundation plantings
Mulch beds
Fence lines
Shrub borders
Landscape edging
Retaining walls
These routes are easier to hide and much less likely to create trip hazards.
Avoid High-Traffic Areas
Extension cords should not routinely cross:
Sidewalks
Driveways
Front steps
Children's play areas
Dog paths
Frequently mowed sections of lawn
If a crossing is unavoidable, use proper cord protection rather than leaving cables exposed where they can be damaged or create a tripping hazard.
Think About Winter Maintenance
Many Christmas decorators overlook how snow changes their yard.
Ask yourself:
Will this cord end up buried beneath snow?
Will I shovel across it?
Could a snowblower catch it?
Will melting snow leave plug connections sitting in water?
Planning for winter conditions now prevents frustrating mid-season repairs.
Likewise, Halloween displays should account for falling leaves, while spring displays may need to consider saturated ground after heavy rain.
Choose the Right Cord for the Route
Not every extension cord belongs everywhere.
Short runs supplying modest loads often require different cords than long runs feeding multiple decorations.
For detailed guidance on selecting cord length, gauge, voltage drop considerations, and cold-weather performance, see "Extension Cord Mistakes That Cause Outdoor Inflatable Failures (Gauge, Length, and Voltage Drop Explained)" and "Best Outdoor Extension Cords for Holiday Inflatables (2026 Buyer's Guide)."
Those articles dive much deeper into cord selection so this guide can remain focused on overall layout planning.
Plan Today for Next Year's Display
One habit shared by experienced decorators is thinking one season ahead.
If you know you'll likely add another inflatable beside the driveway next year, consider routing this year's extension cord so expanding that zone will be easy later.
You may even leave a little extra capacity in the route or reserve space for another power connection.
That forward thinking reduces the temptation to run temporary "just for this year" cords that often become permanent parts of the display.
Build the Electrical Flow for Each Zone
Once you've established your zones, it's helpful to think about each one as a complete electrical system rather than a collection of individual cords.
Many decorating problems happen because components are added in whatever order seems convenient at the time. A little planning creates a layout that's easier to troubleshoot, safer in bad weather, and much simpler to expand.
A typical power flow for one display zone looks something like this:
House Outlet
│
▼
GFCI Protection
│
▼
Outdoor Extension Cord
│
▼
Power Stake or Yard Power Center
│
▼
Timer or Smart Plug (if used)
│
▼
Splitter (only if needed)
│
▼
Inflatables • Lights • Spotlights • Accessories
This isn't the only correct arrangement, but thinking in this order helps prevent many common setup mistakes.
Start With a Reliable Power Source
Every zone begins at the outlet.
Ideally, the outlet should already be protected by a GFCI. If you're uncertain, it's worth confirming before decorating season begins.
If you aren't familiar with outdoor GFCI protection or why it sometimes trips even when nothing appears to be wrong, be sure to read "GFCI Protection for Outdoor Holiday Decorations: What It Is, Why It Trips, and When You Need It." Understanding this one component can eliminate hours of frustrating troubleshooting later.
Use One Main Feed Instead of Multiple Random Cords
One mistake often seen in growing displays is running several extension cords from different outlets into the same section of the yard.
Instead, whenever practical, feed an entire zone from one well-planned primary extension cord.
From there, distribute power in an organized manner.
Benefits include:
Cleaner appearance
Easier troubleshooting
Fewer overlapping cords
Simpler seasonal setup
Easier expansion
Think of each zone as having its own small electrical "hub."
Centralize Power Distribution
For larger zones, it often makes sense to create a central distribution point.
Examples include:
Near the middle of several inflatables
Beside a group of pathway decorations
Behind a shrub where cords remain accessible but hidden
Adjacent to a landscape bed supplying nearby decorations
This central point becomes where timers, power stakes, weatherproof boxes, or splitters can be located instead of scattering them throughout the yard.
For readers exploring different options, "Best Outdoor Power Stakes & Multi-Outlet Yard Power Centers (2026 Buyer's Guide)" compares the strengths of various distribution approaches for displays of different sizes.
Avoid "Power Creep"
Power creep happens gradually.
One year:
One inflatable.
Next year:
Add another.
Then another timer.
Then another splitter.
Soon one outlet is supporting far more than originally intended.
Planning each zone as a complete system makes it much easier to recognize when you've reached a logical expansion limit rather than continuing to add equipment indefinitely.
Keep the System Logical
If someone else needed to troubleshoot your display while you were away, would they understand how power flows through each zone?
If the answer is no, simplify.
A logical layout benefits everyone—including you six months later when you've forgotten exactly how everything was connected.
Protect Every Connection From Weather
Outdoor-rated decorations are designed to handle the elements.
Electrical connections are often the weakest point.
Rain, melting snow, freezing temperatures, lawn irrigation, and even heavy dew can all affect plug connections if they're left exposed.
Planning for weather protection should be part of the original electrical layout—not something added after the first storm.
Keep Connections Off the Ground
Whenever possible:
Avoid allowing plug connections to rest directly on:
Wet grass
Mud
Mulch
Standing water
Snow accumulation areas
Even when using weather-resistant products, elevating connections helps reduce moisture exposure and makes routine inspection much easier.
Identify Connection Locations During Planning
Instead of asking:
"Where do I hide this plug?"
Ask:
"Where should this connection point be located?"
Choosing connection points intentionally often allows you to:
Reduce cord clutter
Improve weather protection
Simplify maintenance
Shorten extension cord runs
Many decorators discover that moving a decoration just a few feet creates a much cleaner and safer connection area.
Protect High-Value Connection Points
Not every plug connection requires the same level of protection.
Priority should be given to areas where multiple devices connect together.
Examples include:
Splitters
Timers
Power stakes
Multi-outlet hubs
Long extension cord junctions
These locations deserve extra attention because a single problem can affect an entire display zone.
Readers looking for specific enclosure recommendations should see "Best Weatherproof Cord Connection Boxes for Outdoor Decorations."
Remember That "Weatherproof" Doesn't Mean "Maintenance-Free"
Even quality weatherproof equipment benefits from occasional inspection.
Throughout the decorating season, check for:
Standing water
Ice buildup
Loose plugs
Damaged insulation
Animal activity
Lawn equipment damage
If you've ever wondered why protected connections sometimes still fail, "Why Weatherproof Outdoor Electrical Boxes Still Fail in Rain, Snow, and Ice (And How to Fix Them for Good)" explains several real-world situations that surprise even experienced decorators.
Plan for Your Local Climate
The ideal electrical layout in Arizona isn't necessarily the best layout in Maine or Minnesota.
When planning your display, consider local conditions such as:
Winter displays:
Heavy snowfall
Ice accumulation
Snowblower paths
Freeze-thaw cycles
Spring displays:
Saturated lawns
Heavy rain
Mud
Halloween:
Falling leaves
Early frost
Wind
Planning with your climate in mind often prevents seasonal problems before they develop.
Design for Easy Maintenance
Many displays look fantastic on opening night.
Then something stops working.
Suddenly, a timer needs to be reset, a GFCI trips, or an inflatable loses power—and the affected component is buried behind a ten-foot inflatable or underneath a pile of extension cords.
Maintenance accessibility is one of the least discussed aspects of electrical planning, yet it can save enormous amounts of time during the season.
Every Zone Should Have an Accessible Service Area
Think of each electrical zone as having a small maintenance hub.
Ideally, you should be able to reach:
Timers
Smart plugs
GFCI reset buttons
Power stakes
Cord connection boxes
Primary splitters
...without moving half your decorations.
Leave Yourself Walking Space
Large displays often become densely packed.
While that may improve visual impact, it can make routine maintenance surprisingly difficult.
As you arrange decorations, leave enough room to:
Walk safely
Reach electrical components
Replace decorations
Inspect cords
Remove snow
Adjust lighting
A display that's slightly less crowded but much easier to maintain usually provides a better long-term experience.
Label Zones During Setup
A simple labeling system can make troubleshooting much faster.
Examples include:
Zone A – Porch
Zone B – Left Lawn
Zone C – Center Display
Zone D – Trees
Zone E – Driveway
If a problem develops in Zone C, you immediately know where to begin instead of tracing cords throughout the yard.
Many experienced decorators also label extension cords or storage bins with the same zone names, making annual setup significantly faster.
Keep Expansion in Mind
Maintenance isn't only about fixing problems.
It's also about making future decorating easier.
Ask yourself:
Can I add another inflatable here next year?
Is there room for another power stake?
Will I be able to access this timer after expanding?
Can this zone grow without redesigning everything?
If the answer is yes, you've built an electrical layout that's designed for long-term success rather than just one holiday season.
Plan for Future Expansion
One of the biggest differences between experienced decorators and first-time display builders is that experienced decorators rarely plan for just this year.
They build an electrical layout that can grow with the display.
If you think you'll eventually add more inflatables, pathway lights, animated decorations, or roofline lighting, make decisions today that make those future upgrades easier.
Leave Capacity in Every Zone
It can be tempting to fully utilize every outlet and every available watt this season.
However, leaving some unused capacity provides valuable flexibility.
Instead of designing each zone to support exactly today's decorations, consider how it might look two or three seasons from now.
For example:
Leave an unused outlet on a power stake.
Reserve room in a weatherproof connection box.
Route a cord that could also reach a future inflatable location.
Keep a little electrical capacity available for seasonal additions.
This forward-thinking approach reduces the need to redesign your layout every year.
Build Around Growth, Not Maximum Capacity
Think of your display as evolving through stages.
Plan Decoration Locations With Expansion in Mind
When placing decorations, ask yourself:
Could another inflatable fit beside this one next year?
Will another spotlight likely be added?
Would a future pathway display require power nearby?
Is there enough room for another power distribution point?
These questions often influence where you place extension cords today.
Sometimes moving one cord six feet now prevents replacing it entirely next season.
Know When Temporary Solutions Should Become Permanent
Many decorators eventually reach a point where seasonal extension cords are no longer the best long-term solution.
Possible indicators include:
Multiple heavy-duty extension cords running from one side of the house.
Consistently using every available outdoor outlet.
Very long cord runs every season.
Large portions of the display depending on one receptacle.
Annual setup taking significantly longer because of power routing.
At that stage, discussing additional outdoor receptacles or dedicated exterior circuits with a qualified electrician may be more practical than continually expanding temporary wiring.
The goal isn't to eliminate extension cords—it's to use them intentionally rather than relying on them to compensate for a layout that has outgrown the available electrical infrastructure.
Real-World Electrical Layout Examples
Every property is different, but the planning principles remain remarkably consistent.
Here are several examples of how the same concepts can be applied to different display styles.
Example 1 — Small Ranch Home
Display:
Two inflatables
Porch lights
Mailbox decoration
Layout Strategy:
One primary electrical zone
Short extension cord runs
One timer controlling the entire display
Minimal maintenance points
This is ideal for decorators just beginning to expand beyond a basic setup.
Example 2 — Two-Story Suburban Home
Display:
Roofline lights
Four inflatables
Walkway lighting
Landscape spotlights
Layout Strategy:
Separate roofline and lawn zones
Independent timer schedules
Two primary distribution areas
Balanced electrical load between available circuits
This arrangement simplifies troubleshooting while reducing unnecessary cord crossings.
Example 3 — Corner Lot
Corner lots often require power distribution in multiple directions.
Planning priorities include:
Avoiding sidewalk crossings
Minimizing highly visible extension cords
Creating independent zones for each street-facing section
Maintaining safe pedestrian access
Instead of one central hub, several smaller hubs often work better.
Example 4 — Large Inflatable Display
Suppose your yard contains:
Eight inflatables
Animated figures
Spotlights
Rather than powering each inflatable individually from the house, organize them into logical groups.
For example:
Left Lawn Zone
Center Lawn Zone
Right Lawn Zone
Each zone can then be managed independently, making expansion and troubleshooting much easier.
If you're planning a display of this size, you'll also benefit from "Best Outdoor Power Solutions for Large Multi-Inflatable Displays (10+ Units)", which explores equipment choices for larger installations.
Example 5 — Halloween Cemetery Display
Halloween layouts often include:
Fog machines
Spotlights
Animated props
Audio equipment
Pathway lighting
Unlike many Christmas displays, Halloween setups frequently place decorations farther from the house.
Planning extension cord routes before decorating becomes even more important to avoid trip hazards and visible wiring.
Example 6 — Spring or Patriotic Display
Spring inflatables and patriotic decorations typically use less lighting than Christmas displays.
That often allows:
Simpler zones
Shorter setup time
Easier maintenance
Greater flexibility when rearranging decorations
The same electrical planning process still applies—even if the display itself is smaller.
Key Takeaways
Start by sketching your display before purchasing extension cords or accessories.
Divide larger displays into logical electrical zones instead of treating the entire yard as one system.
Estimate electrical demand for each zone before adding decorations.
Understand which outdoor outlets share the same circuit.
Route extension cords intentionally to reduce clutter, trip hazards, and maintenance issues.
Protect important electrical connections from weather and make them easy to access.
Leave room for future growth instead of designing only for this season.
Treat your display as an organized electrical system rather than a collection of individual decorations.
Mini Conclusion
Designing the electrical layout for a large outdoor holiday display isn't about making things more complicated—it's about making decorating easier.
A little planning before the first extension cord is plugged in can save hours of troubleshooting later, reduce unnecessary purchases, improve safety, and make future expansion much simpler.
As your display grows from year to year, you'll appreciate having an organized electrical system that grows with it rather than one that needs to be reinvented every holiday season.
Frequently Asked Questions
How many outdoor outlets should a large holiday display use?
There's no universal number. The best approach is to divide your display into logical electrical zones and distribute those zones across available circuits instead of trying to power everything from a single outlet.
How do I know if two outdoor outlets share the same circuit?
Turn off individual breakers one at a time and test which outlets lose power. Recording this information on a simple property sketch makes future planning much easier.
Should every display zone have its own timer?
Not necessarily. Decorations with similar operating schedules can often share one timer, while displays with different schedules may benefit from independent control.
Can multiple inflatables share one extension cord?
Often they can, provided the combined electrical load remains within the limits of the extension cord and circuit. Estimating total wattage before setup is the safest approach.
What's the safest way to route extension cords across a yard?
Whenever possible, follow landscaping edges, avoid sidewalks and driveways, and keep cords away from areas where lawn equipment, pets, or pedestrians are likely to contact them.
When should I consider adding another outdoor outlet?
If your display consistently depends on long extension cord runs, overloaded areas, or temporary workarounds every season, additional permanent outdoor receptacles may be worth discussing with a qualified electrician.
Is it better to use power stakes or several extension cords?
For many larger displays, a planned power distribution point can create a cleaner, easier-to-maintain layout. The right choice depends on the size and organization of your display.
How can I make next year's setup easier?
Label electrical zones, document your layout with photos, store cords by zone, and leave room for future decorations during this year's planning.
Whether you're decorating for Christmas, Halloween, Easter, Independence Day, or another celebration, investing a little time in electrical planning pays dividends every season. A well-designed layout is safer, easier to troubleshoot, faster to set up, and far more enjoyable to expand as your display grows.
Related Articles
Continue building your outdoor power knowledge with these guides:
The Ultimate Guide to Powering Outdoor Inflatables Safely: Extension Cords, GFCI Protection, Weatherproofing and Load Planning — Learn the complete foundation for safe and reliable outdoor electrical setups.
How to Power Multiple Outdoor Inflatables Safely Without Overloading Your Circuit — Understand practical load balancing and circuit management for expanding displays.
Best Outdoor Extension Cords for Holiday Inflatables (2026 Buyer's Guide) — Compare extension cords by gauge, length, durability, and intended use.
Best Weatherproof Cord Connection Boxes for Outdoor Decorations — Find the right solution for protecting outdoor plug connections from rain, snow, and ice.
Best Outdoor Power Stakes & Multi-Outlet Yard Power Centers (2026 Buyer's Guide) — Compare centralized power distribution options for medium and large holiday displays.
InflatableHoliday.com
Practical decorating ideas, buying guides, and setup and maintenance advice for outdoor holiday inflatables throughout the year.
Affiliate Disclosure
As an Amazon Associate I earn from qualifying purchases. Some links on this page are affiliate links — if you buy through them, InflatableHoliday may earn a commission at no extra cost to you. Prices and availability change, so the price you see on Amazon is the one that counts.
© 2026 InflatableHoliday.com