How to Set Up a Bounce House Safely (2026 Step‑By‑Step Guide)
Learn how to safely set up any bounce house in 2026 with Frosty’s step by step method. Covers yard prep, anchoring, blower setup, airflow management, stability checks, and safety rules for nylon, hybrid, and PVC inflatables.
By Frank “Frosty” Adminei
5/19/20267 min read
How to Set Up a Bounce House Safely (2026 Step‑By‑Step Guide)
By Frank “Frosty” Adminei

INTRO
Setting up a bounce house looks simple — until you’re standing in your yard with a heavy roll of nylon or PVC, a blower that sounds like a jet engine, and kids asking when it’ll be ready. As I like to say: “A bounce house is only as safe as its setup.” And that’s the truth.
This guide gives you the exact step‑by‑step process I use when preparing inflatables for families, parties, and product testing. Whether you’re working with a lightweight nylon unit or a full commercial PVC castle, the fundamentals never change: prepare the site, anchor correctly, manage airflow, and verify stability before anyone jumps.
Throughout this guide, you’ll find internal links to deeper resources like the Bounce House Anchoring Guide (2026), the Power, Extension Cords & Blower Guide (2026), and the Bounce House Safety Checklist (2026) so you can explore any step in more detail.
WHO THIS GUIDE IS FOR
This setup guide is designed for:
Parents setting up a bounce house for the first time
Homeowners who want a safe, repeatable process
Beginners who want clear, non‑technical instructions
Anyone who wants to avoid common mistakes like poor anchoring or blower misplacement
Owners of nylon, hybrid, or commercial PVC units
If you’re still choosing a bounce house, start with the pillar:
How to Choose the Right Bounce House (2026 Buyer Guide).
WHY SAFE SETUP MATTERS
Even the best bounce house can become unsafe if:
Anchors are placed incorrectly
The blower is obstructed
The yard isn’t level
The landing zone isn’t clear
The inflation tube is twisted
Stakes aren’t driven at the correct angle
Most accidents happen before kids start bouncing — during setup.
AGE GROUP SETUP CONSIDERATIONS
Different age groups require different setup adjustments.
Toddlers (2–3)
Lower slide angles
Extra padding at entry
Wider fall‑zone clearance
Kids 3–7
Standard nylon anchoring is sufficient
Keep blower noise behind the unit
Kids 8–12
Reinforced anchoring recommended
Check wall firmness more frequently
Teens & Adults
PVC commercial units only
Requires 80–100 lb sandbags on patios
Must be staked at all anchor points
For age‑specific buying advice, see Best Bounce Houses by Age Group (2026 Guide).
THE 4‑PHASE SETUP SYSTEM (FROSTY METHOD)
Every safe bounce house setup follows the same four‑phase sequence:
Site Prep
Anchoring
Blower & Airflow Management
Stability Verification
PHASE 1 — SITE PREP (THE SAFETY FOUNDATION)
Site prep determines 70% of your setup success.
If you get this wrong, nothing else will compensate.
⭐ 1. Yard Slope Tolerance (≤ 5°)
Use your phone’s built‑in level app.
Why slope matters:
A 5° slope shifts the center of mass by 8–12 inches, causing:
Drift toward the low side
Uneven wall tension
Slide landing misalignment
If your yard is borderline, use the Bounce House Size Calculator (2026) to confirm fit.
⭐ 2. Clearance Geometry
Clearances prevent wall deformation, blower obstruction, and collision hazards.
Nylon units: 3 ft on all sides
PVC units: 5 ft on all sides
Overhead: 10–15 ft
Fall‑zone: 2–5 ft depending on age group
If you’re unsure about yard fit, see Best Bounce Houses for Small Yards (2026 Guide).
⭐ 3. Surface Type Behavior
Grass (Ideal)
Best stake penetration
Natural shock absorption
Most stable for PVC units
Patio / Concrete
Requires sandbags
No stake penetration
Higher landing impact
Must pad slide landing zones
Artificial Turf
Stakes may not penetrate
Heat buildup under PVC
Requires weighted anchoring
For anchoring specifics, see Bounce House Anchoring Guide (2026): Stakes, Sandbags & Stability Physics.
⭐ 4. Debris & Hazard Check
Remove:
Rocks
Sticks
Toys
Sprinkler heads
Sharp debris
Even small objects can puncture nylon or stress PVC seams.
⭐ 5. Traffic Flow Check
Entry should face:
Open space
Clear walking path
Away from the blower
This reduces collisions and keeps kids from tripping over cords.
PHASE 2 — ANCHORING (THE SAFETY BACKBONE)
Anchoring determines 80% of bounce house stability.
⭐ 1. Stake Anchoring (Grass)
Drive stakes:
At a 45° angle away from the unit
Until only 1–2 inches is exposed
Using 12–18" steel stakes
Why 45°?
Maximizes horizontal resistance
Reduces vertical pullout
Distributes load across soil layers
For stake recommendations, see Best Bounce House Stakes (2026).
⭐ 2. Sandbag Anchoring (Patio / Concrete)
Weight requirements:
Nylon: 40–60 lb per anchor
PVC: 80–100 lb per anchor
Slide bases: add 20–40 lb
Sandbags must be:
Low
Wide
Evenly distributed
Stacking sandbags reduces shear resistance — wide base is safer.
See Best Sandbags for Bounce Houses (2026).
⭐ 3. Anchor Point Tensioning
After inflation:
Pull each anchor point outward
Remove slack
Ensure equal tension around the perimeter
Uneven tension = uneven wall height = unsafe bounce dynamics.
PHASE 3 — BLOWER & AIRFLOW MANAGEMENT
Airflow determines firmness, wall stability, and landing safety.
⭐ 1. Blower Placement Physics
Place the blower:
Behind the unit
3 ft from walls/fences
On the upwind side
On a flat, dry surface
This prevents intake obstruction and improves airflow consistency.
⭐ 2. Power Safety
Use 12–14 gauge outdoor extension cords
Avoid daisy‑chaining
Keep cords away from walkways
Use GFCI outlets when possible
For deeper power guidance, see Power, Extension Cords & Blower Guide (2026).
⭐ 3. Inflation Tube Behavior
The tube must be:
Straight
Untwisted
Fully sealed
Not kinked
A kinked tube reduces airflow by 20–40%, causing soft walls and unsafe bounce zones.
PHASE 4 — STABILITY VERIFICATION (THE FINAL SAFETY GATE)
This is the Frosty‑level safety check — the final gate before kids enter.
⭐ 1. Wall Firmness Test
Press the wall with your palm:
Nylon: quick rebound
PVC: rigid with slight give
Soft walls = airflow issue or open zipper.
⭐ 2. Slide Base Tension Test
Slide bases take the highest impact load.
Check for:
Firm landing zone
No sagging
Even tension left to right
If one side sags, re‑tension anchors.
⭐ 3. Mesh Integrity Check
Mesh must be:
Tight
Even
Free of stretching
Free of tears
Mesh failures are the #1 cause of mid‑use shutdowns.
THE FROSTY OPERATOR METHOD (FULL STEP‑BY‑STEP)
This is the exact setup sequence I use in the field.
Follow this, and your bounce house will be safe, stable, and ready for any age group.
⭐ STEP 1 — PREP THE SITE (THE 5‑POINT SAFETY GRID)
Before unrolling anything, confirm the site passes all five checks.
1. Slope Check (≤ 5°)
Use your phone’s level app.
If the bubble moves noticeably, you’re close to the limit.
If unsure, use the Bounce House Size Calculator (2026).
2. Clearance Check
Nylon: 3 ft
PVC: 5 ft
Overhead: 10–15 ft
Fall‑zone: 2–5 ft
3. Surface Check
Choose the safest surface available.
4. Debris Check
Remove rocks, sticks, toys, sprinkler heads, and sharp debris.
5. Traffic Flow Check
Entry should face open space and avoid blower/cord paths.
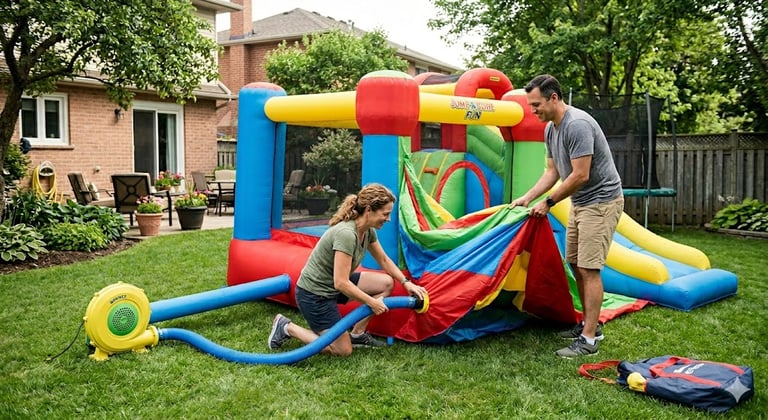
⭐ STEP 2 — UNROLL & POSITION THE UNIT
Unroll the bounce house:
With the entry facing the safest direction
With the blower tube downwind
With the slide landing zone on the flattest area
PVC units require two people to avoid seam stress.
⭐ STEP 3 — ANCHORING (THE SAFETY BACKBONE)
Anchoring determines 80% of bounce house stability.
1. Stake Anchoring (Grass)
Drive stakes at 45°, 12–18" long, 1–2" exposed.
2. Sandbag Anchoring (Patio / Concrete)
Nylon: 40–60 lb
PVC: 80–100 lb
Slide bases: +20–40 lb
3. Anchor Tensioning
After inflation, pull each anchor point outward and remove slack.
⭐ STEP 4 — BLOWER SETUP & AIRFLOW MANAGEMENT
1. Blower Placement
Behind the unit, 3 ft clearance, upwind side.
2. Power Safety
Use 12–14 gauge cords, avoid daisy‑chaining, use GFCI.
3. Inflation Tube Behavior
Straight, untwisted, sealed, not kinked.
⭐ STEP 5 — STABILITY VERIFICATION (THE FINAL SAFETY GATE)
1. Wall Firmness Test
Nylon rebounds quickly; PVC is rigid with slight give.
2. Slide Base Tension Test
Check for sagging or uneven tension.
3. Mesh Integrity Check
Tight, even, no tears.
AGE‑SPECIFIC SETUP VARIATIONS
Different age groups require different setup adjustments.
⭐ Toddlers (2–3)
Add padding at entry
Lower slide angle preferred
Extra fall‑zone clearance
Keep blower noise behind the unit
⭐ Kids 3–7
Standard nylon anchoring is sufficient
Keep blower cords behind the unit
Check wall firmness every 30 minutes
⭐ Kids 8–12
Reinforced anchoring recommended
Ensure slide base is fully tensioned
Check mesh integrity before use
⭐ Teens & Adults
PVC commercial units only
Full anchoring required
Sandbags mandatory on patios
Check blower intake every 20 minutes
For age‑specific buying advice, see Best Bounce Houses by Age Group (2026 Guide).
SAFETY SEGMENTATION (MANDATORY)
This section reinforces the safety rules that apply regardless of age or material.
⭐ Weather Rules
Wind: ≤ 15 mph
Rain: Stop use immediately
Temperature: Avoid > 95°F on PVC
See Bounce House Weather Guide (2026).
⭐ Supervision Rules
One adult minimum
No flips
No climbing walls
No shoes
No food or drinks
⭐ Capacity Rules
Follow manufacturer limits:
Toddlers: 1–2
Kids 3–7: 2–3
Kids 8–12: 3–4
Teens/Adults: PVC only

FROSTY’S SETUP SCENARIOS (REAL‑WORLD GUIDANCE)
These scenarios help readers apply the setup method to their actual yard and bounce house.
⭐ Scenario 1 — Small Yard, Nylon Unit
Use 8×8 or 10×10 footprint
Stake at 45°
Keep blower behind the unit
Add padding at entry for toddlers
⭐ Scenario 2 — Medium Yard, Hybrid Unit
Use 12×12 footprint
Stake or sandbag depending on surface
Check slide base tension
Confirm wall firmness every 30 minutes
⭐ Scenario 3 — Patio Setup (Any Material)
Use sandbags only
Add padding under slide landing
Keep blower intake clear
Check sandbag shift every hour
⭐ Scenario 4 — PVC Commercial Unit
Stake all anchor points
Use 1.0–1.5 HP blower
Confirm 5 ft clearance
Check mesh integrity before use
⭐ Scenario 5 — Windy Day Setup
Cancel if wind exceeds 15 mph
Add extra sandbags on corners
Keep blower intake upwind
Recheck anchors every 20 minutes
For full weather rules, see Bounce House Weather Guide (2026): Wind, Rain & Temperature Rules.
COMMON SETUP MISTAKES (AND HOW TO AVOID THEM)
These are the mistakes I see most often during field inspections.
❌ Anchoring only 2–4 points
Fix: Anchor every point the manufacturer provides.
❌ Using short stakes
Fix: Use 12–18" steel stakes for grass setups.
❌ Placing the blower too close to a wall
Fix: Keep 3 ft clearance around the blower intake.
❌ Ignoring slope
Fix: Keep slope under 5° or reposition the unit.
❌ Not checking wall firmness
Fix: Test firmness before every session and every 30 minutes.
❌ Setting up on concrete without sandbags
Fix: Use 40–100 lb sandbags per anchor point.
KEY TAKEAWAYS (MANDATORY)
Safe setup = site prep + anchoring + airflow + verification
Stakes must be 12–18" and driven at 45°
Sandbags must be wide‑based, not stacked
Blower placement affects airflow and safety
Wall firmness is the #1 safety indicator
PVC units require full anchoring
Wind over 15 mph = shut down
MINI CONCLUSION (MANDATORY)
A bounce house is only as safe as its setup. Follow the Frosty Operator Method — prepare the site, anchor correctly, manage airflow, and verify stability — and you’ll have a safe, reliable setup every time. Whether you’re working with nylon, hybrid, or PVC, these steps ensure your bounce house performs exactly as it should.
FAQ
RELATED ARTICLES
Before you set up your bounce house, you may want to explore these related guides to ensure your yard, anchoring, and blower setup are fully optimized: