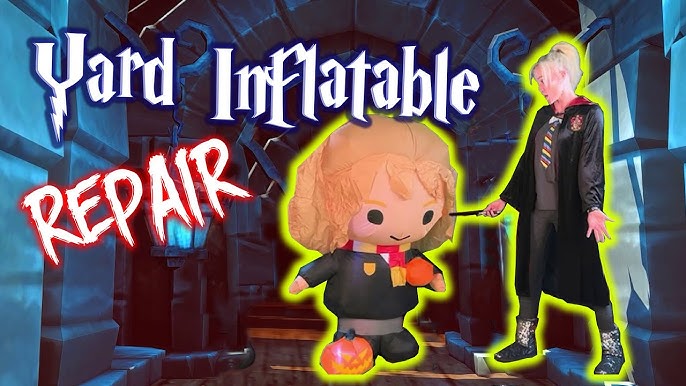
Ultimate Guide to Repairing and Troubleshooting Inflatable Decorations
Learn how to repair, secure, clean, and troubleshoot inflatable holiday decorations with step by step fixes for leaks, fans, LEDs, weather damage, and theft prevention.
By Frank “Frosty” Adminei
3/9/202619 min read
Inflatable decorations can be repaired and kept working for years with the right techniques—whether you’re fixing leaks, securing them against wind, restoring fans, replacing LEDs, or preventing theft. Most issues come down to airflow, anchoring, weather exposure, or small material failures, all of which can be corrected with simple tools and step‑by‑step methods.
Overview
Inflatable holiday decorations are built from lightweight fabric, internal fans, and LED lighting systems that must work together to keep the decoration upright, bright, and stable. When something goes wrong—like sagging, blowing away, dim lights, or a sudden leak—the root cause is usually easy to diagnose. This guide walks through every major repair scenario, from patching holes to fixing fans, securing inflatables on concrete, cleaning them safely, and storing them for long-term durability. It also includes theft‑prevention strategies, climate‑specific considerations, and real‑world examples to help homeowners troubleshoot confidently in any region.
Introduction
Inflatable decorations bring a lot of joy to a yard, but they also take a beating—wind, rain, snow, UV exposure, and the occasional curious animal or mischievous passerby. Most failures look dramatic but are surprisingly simple to fix once you understand how airflow, anchoring, and fabric integrity work together. This guide breaks down every major repair scenario using clear steps, real‑world examples, and practical techniques you can use in any climate.
Many homeowners are surprised to learn that a single weak stake, a clogged fan, or a tiny pinhole can cause an inflatable to collapse. With the right tools and a little patience, you can restore almost any inflatable to full strength and keep it running for years.
For foundational repair techniques, start with Best Practice Tips to Repair Your Inflatable Decorations.
1. How to Deter Theft of Your Inflatable Decorations
Why theft happens Inflatables are lightweight, easy to grab, and often placed near the street. Thieves typically look for poorly anchored decorations or dark, unmonitored areas. A few strategic upgrades make your display far less appealing to opportunists.
Practical deterrents
Use ground anchors that can’t be cut easily, such as coated steel cables.
Add motion‑activated lighting to illuminate the area when someone approaches.
Install a discreet GPS tracker inside larger inflatables.
Use locking stakes that require tools to remove.
Place inflatables closer to the house rather than near sidewalks.
Real‑world example A homeowner in a windy coastal area kept losing inflatables to both storms and theft. After switching to steel cable tethers and adding a solar motion light, theft attempts stopped entirely.
Troubleshooting theft risks
If your inflatable is near a public walkway, move it back 5–10 feet.
If you’ve had theft before, use two anchoring systems—stakes + cable.
If you live in a high‑traffic neighborhood, consider inflatable timers so they’re only inflated when you’re home.
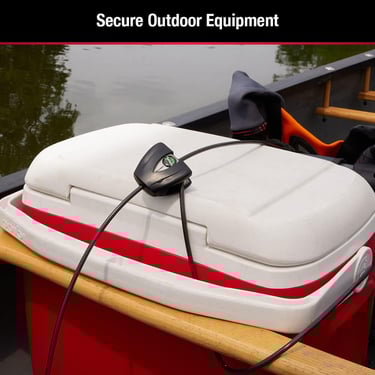
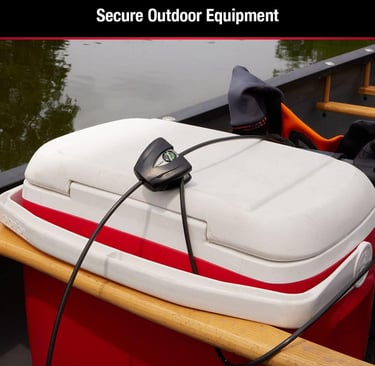
Heavy‑Duty Outdoor Security Cable (for Theft Prevention)
1. What this product is
A vinyl‑coated steel security cable designed to lock inflatables to fixed objects like porch railings, fence posts, or ground anchors. The coating prevents abrasion while providing cut‑resistant strength far beyond standard fabric tethers.
2. Why it fits this guide
Theft deterrence depends on making inflatables difficult, noisy, or time‑consuming to remove. A steel cable dramatically increases the effort required, stopping opportunistic thieves who rely on quick grabs.
3. Who this product is best for
Homeowners in high‑traffic neighborhoods, anyone displaying inflatables near sidewalks, and people who’ve experienced theft attempts in the past. It’s also ideal for large inflatables that are more visible and tempting targets.
4. Why it was selected
Steel cables offer the best balance of strength, weather resistance, and low visibility. They blend into nighttime displays while providing real security. They also work across all climates—from humid coastal regions to freezing northern winters.
5. Problems it solves
Prevents quick snatch‑and‑run theft
Stops thieves from cutting standard fabric tethers
Keeps inflatables secure during overnight hours
Adds stability in windy conditions
Reduces the need for constant monitoring
6. Limitations
Requires a lock (not included)
Must be attached to a fixed object
Not a replacement for good lighting or camera coverage
Can be stiff in extreme cold until warmed slightly
7. Discovery Fingerprint
Search terms that reliably surface this type of product: “vinyl coated steel security cable outdoor,” “cut resistant cable lock holiday inflatables,” “weatherproof security cable for yard decorations.”
2. How to Patch Inflatable Decorations (Step by Step)
Finding the leak
Leaks are usually caused by abrasion, pet claws, or seam stress. To locate them:
Inflate the decoration fully.
Spray with soapy water and look for bubbles.
Mark the leak with painter’s tape.
For step‑by‑step instructions on patching and sealing damage, see How to Fix Seams, Tears & Holes in Holiday Inflatables (Beginner to Pro Repairs).
Patching steps
Deflate completely and clean the area with mild soap.
Dry thoroughly—moisture prevents adhesion.
Apply a vinyl repair patch or fabric patch depending on material.
Press firmly for 30–60 seconds.
Reinforce edges with clear outdoor tape if needed.
Re‑inflate and check for airflow consistency.
Mini example A small 1" tear on a Santa inflatable can be patched in under 10 minutes using a vinyl patch kit and a hair dryer to warm the adhesive.
Troubleshooting patch failures
If the patch peels, the surface wasn’t fully dry.
If the inflatable still sags, check for secondary micro‑leaks.
If the tear is on a seam, skip patching and move to seam repair techniques (covered later).
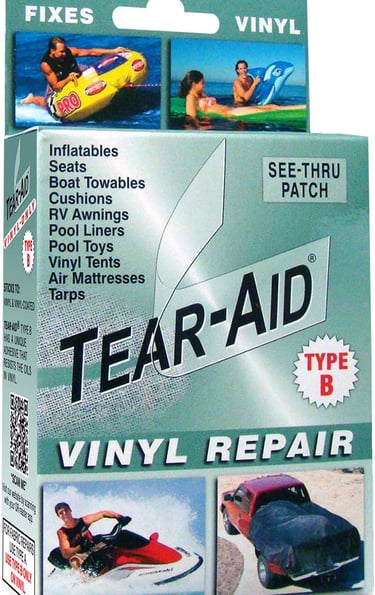
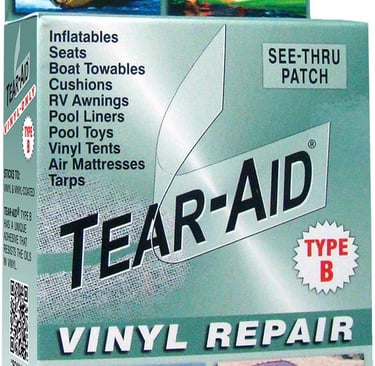
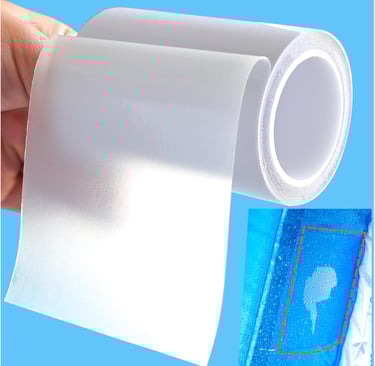
Vinyl Repair Patch Kit (for Patching Inflatables)
1. What this product is
A clear vinyl repair patch kit designed specifically for flexible outdoor materials like inflatable holiday decorations, pool toys, and air mattresses. These kits typically include pre‑cut patches, adhesive, and surface prep wipes to ensure a strong, weather‑resistant bond.
2. Why it fits this guide
Patching is one of the most common inflatable repairs, and vinyl patches provide a fast, durable, and nearly invisible fix. They bond tightly to the thin polyester‑vinyl blend used in most inflatables, restoring full pressure without stiffening the fabric.
3. Who this product is best for
Homeowners dealing with:
Small to medium tears (½" to 3")
Pinholes from branches, pets, or ice
Abrasion damage from storage bins or rough surfaces
Slow leaks that are hard to locate
It’s especially useful for people who want a clean, clear repair that doesn’t stand out in daylight.
4. Why it was selected
Vinyl patch kits offer the best combination of adhesion strength, flexibility, and weather resistance. They work in humid climates, cold winters, and hot sun without peeling. They also cure quickly, making them ideal for mid‑season repairs.
5. Problems it solves
Stops slow leaks that cause sagging
Repairs tears without sewing
Prevents air loss in high‑stress areas
Extends the life of older inflatables
Works on both interior and exterior surfaces
6. Limitations
Not ideal for seam failures (requires seam adhesive instead)
Large tears over 4" may need double‑patch reinforcement
Adhesive may take longer to cure in cold weather
Surface must be fully dry for best results
7. Discovery Fingerprint
Search terms that reliably surface this type of product:
“clear vinyl repair patch kit,” “inflatable patch adhesive outdoor,” “vinyl tear repair kit weatherproof.”
3. How to Fix an Inflatable Fan
Common fan issues
Fans fail due to debris, moisture, bent blades, or worn motors. Most problems are fixable without replacing the entire unit.
Quick diagnostic checks
Is the fan humming but not spinning? → Blade obstruction.
Is the fan silent? → Power or motor issue.
Is the airflow weak? → Clogged intake or fabric blockage.
Fixing steps
Unplug the inflatable.
Remove the fan housing screws.
Clear leaves, pine needles, or pet hair.
Spin the blade manually to check for resistance.
Tighten loose screws around the motor mount.
Reassemble and test.
For blower‑related troubleshooting, refer to How to Fix an Inflatable Decoration Fan (Step by Step Guide).
Real‑world example After a heavy rain, a homeowner found their snowman inflatable barely standing. The fan was packed with wet leaves. A 5‑minute cleaning restored full airflow.
Troubleshooting fan failures
If the fan runs but airflow is weak, check for collapsed internal air channels.
If the fan doesn’t run at all, test with a different outlet before assuming motor failure.
If the fan vibrates loudly, the blade may be unbalanced—gently bend it back.
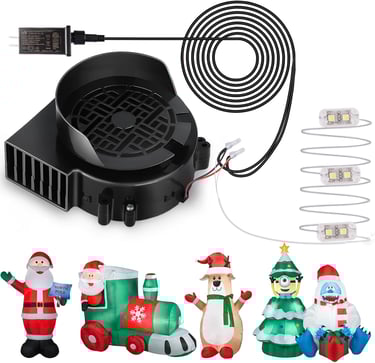
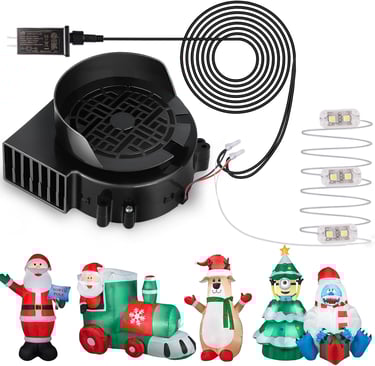
Replacement High‑Output Inflatable Fan (for Fan Repair)
1. What this product is
A high‑output replacement blower fan designed for holiday inflatables, typically rated between 0.6A and 1.2A depending on size. These units include a built‑in intake guard, mounting bracket, and power cord compatible with most major inflatable brands.
2. Why it fits this guide
Fan issues are one of the most common reasons inflatables won’t stand up. While many problems can be fixed with cleaning or tightening screws, some fans are simply worn out. A replacement blower restores full airflow, allowing the inflatable to reach its intended height and shape.
3. Who this product is best for
Homeowners experiencing:
Silent fans that no longer power on
Weak airflow even after cleaning
Overheating motors
Fans damaged by moisture or debris
Older inflatables with declining performance
It’s especially useful for large inflatables (8 ft+) that require strong, consistent airflow.
4. Why it was selected
Replacement fans offer a plug‑and‑play solution that extends the life of an inflatable without replacing the entire decoration. They’re durable, weather‑resistant, and designed to maintain stable pressure even in cold or damp conditions.
5. Problems it solves
Restores full inflation height
Fixes sagging caused by weak airflow
Replaces motors damaged by rain or debris
Eliminates loud vibration from worn bearings
Improves performance in cold climates where older fans struggle
6. Limitations
Requires removing the old fan housing
Must match the correct amperage for the inflatable
Not ideal for inflatables with integrated LED‑fan combos unless compatible
Installation requires a screwdriver and 5–10 minutes of access space
7. Discovery Fingerprint
Search terms that reliably surface this type of product:
“replacement inflatable blower fan,” “holiday inflatable fan motor,” “0.8A inflatable blower replacement.”
4. How to Fix Inflatables Not Standing Up
Why inflatables collapse
Most inflatables fall over because airflow is restricted, anchoring is weak, or internal structure has shifted. Even a small obstruction—like a twisted internal air channel—can cause a full collapse. Cold climates like New England often stiffen the fabric, making it harder for the inflatable to rise quickly.
Core fixes
Check the fan first. Weak airflow is the #1 cause of sagging. Clear debris and confirm the intake isn’t pressed against grass or mulch.
Straighten internal air channels. Many inflatables have fabric “tunnels” that direct air upward. If they fold, the inflatable won’t stand.
Reposition stakes. Stakes should pull outward, not straight down.
Add tension to guy lines. Loose lines allow wobbling, which leads to collapse in wind.
Warm the fabric in cold weather. A quick pass with a hair dryer softens stiff vinyl so it inflates properly.
Real‑world example A homeowner in Massachusetts found their 10‑ft reindeer kept folding at the neck. The issue wasn’t the fan—it was a twisted internal air channel. Straightening it restored full height instantly.
Troubleshooting
If the inflatable rises halfway then collapses, check for partial blockages in the intake.
If it leans to one side, adjust stake angles to create balanced tension.
If it only collapses at night, dew or frost may be weighing down the fabric—wipe it down before inflating.
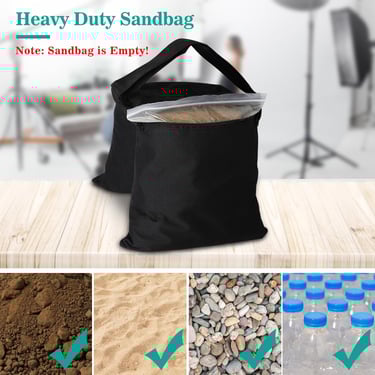

Internal Weight Bags (for Stability and Upright Inflation)
1. What this product is
Internal weight bags are small, fabric‑covered sandbags designed to sit inside the base of an inflatable. They add low‑centered weight that stabilizes the structure without affecting airflow or visibility.
2. Why it fits this guide
Inflatables that rise halfway and collapse often need internal ballast to counter wind, uneven ground, or stiff fabric. Weight bags help the inflatable “plant” itself, allowing the fan to build pressure more effectively.
3. Who this product is best for
These are ideal for:
Tall inflatables with narrow bases
Wind‑exposed yards
Concrete setups where stakes aren’t an option
Inflatables with top‑heavy designs (snowmen, characters with hats, etc.)
4. Why it was selected
Weight bags are discreet, reusable, and compatible with all inflatables. They provide stability without altering the appearance of the display and work in all climates.
5. Problems it solves
Prevents tipping during inflation
Helps inflatables stand evenly
Reduces wobbling in wind
Adds stability on concrete or pavers
Improves airflow efficiency by keeping the base grounded
6. Limitations
Must be placed carefully to avoid blocking the intake
Adds weight to storage
Not a substitute for proper anchoring in high winds
May shift if not secured inside the base
7. Discovery Fingerprint
Search terms that reliably surface this type of product:
“inflatable weight bags,” “sandbag weights for yard decorations,” “ballast bags for outdoor inflatables.”
5. How to Keep Inflatables From Blowing Away
Why wind wins
Inflatables act like sails. Even small gusts can lift them if anchoring is weak or the ground is soft. Winter freeze‑thaw cycles in northern states loosen soil, making stakes unreliable.
Anchoring strategies
Use longer stakes (8–12 inches) for soft soil.
Cross‑stake at 45° angles for maximum resistance.
Add weight bags inside the inflatable’s base.
Use coated steel cable instead of fabric tethers in high‑wind regions.
Place inflatables near windbreaks like shrubs or fences.
Mini example A homeowner in the Midwest kept losing a tall Santa to 30 mph gusts. Switching to 12" spiral dog‑tie stakes and adding two sandbags inside the base solved the issue permanently.
Troubleshooting
If stakes pull out easily, switch to spiral stakes.
If the inflatable “hops,” add internal weights.
If the inflatable twists, reposition guy lines to create triangular tension.
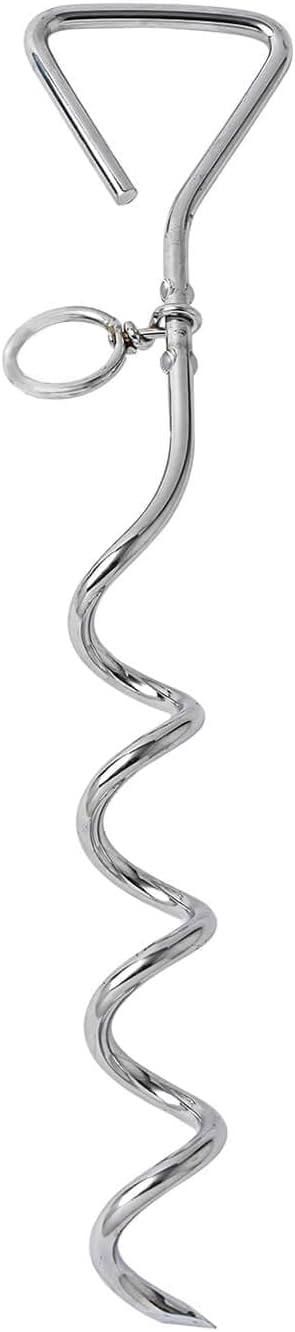
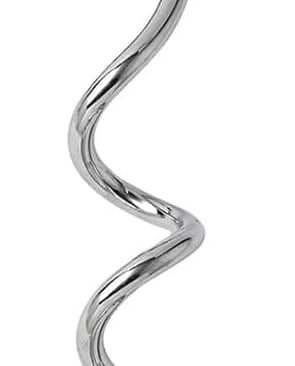
12" Heavy‑Duty Spiral Dog‑Tie Stakes (for Wind Resistance)
1. What this product is
A 12‑inch spiral dog‑tie stake made from heavy‑gauge steel, designed to twist deep into the ground and resist strong upward and sideways force. These anchors are significantly stronger than standard inflatable stakes and are built to hold firm in gusty conditions.
2. Why it fits this guide
Wind is one of the biggest threats to outdoor inflatables. Standard stakes often pull loose during gusts or when soil softens from rain or freeze‑thaw cycles. Spiral dog‑tie stakes provide deep, rotational grip, making them ideal for high‑wind regions.
3. Who this product is best for
Homeowners dealing with:
Frequent wind gusts (15–30 mph)
Soft or sandy soil
Large inflatables (8–20 ft)
Open yards without natural windbreaks
They’re especially effective in coastal regions and the Midwest, where wind patterns are unpredictable.
4. Why it was selected
These stakes offer maximum holding strength with minimal installation effort. Their corkscrew design resists pullout far better than straight stakes, and they maintain tension even when the inflatable shifts.
5. Problems it solves
Prevents inflatables from lifting or “hopping”
Stops stakes from loosening in soft soil
Keeps tall inflatables stable during gusts
Reduces wobbling that leads to collapse
Provides a long‑term anchoring solution for windy climates
6. Limitations
Difficult to install in rocky or frozen soil
Requires twisting force to insert fully
Must be paired with strong tethers
Not ideal for concrete setups (see Section 6)
7. Discovery Fingerprint
Search terms that reliably surface this type of product:
“12 inch spiral dog tie stake heavy duty,” “corkscrew ground anchor wind resistant,” “deep spiral stake for outdoor inflatables.”
6. How to Secure Inflatables on Concrete
Why concrete is tricky
Concrete offers no soil for stakes, so inflatables rely entirely on weights, anchors, and friction. Wind tunnels between houses or garages can make the problem worse.
Best securing methods
Use weight plates (gym plates, pavers, or sandbags) attached to the tether loops.
Place the inflatable on a non‑slip mat to increase friction.
Use water‑filled jugs hidden behind the inflatable for discreet anchoring.
Attach tethers to fixed points like porch railings or fence posts.
Use adhesive hooks rated for outdoor use on smooth concrete walls.
Real‑world example A homeowner displaying inflatables on a driveway used two 25‑lb weight plates connected with carabiners to the tether loops. Even in 20 mph winds, the inflatable stayed perfectly upright.
Troubleshooting
If the inflatable slides, add a rubber mat underneath.
If tethers loosen, switch to locking carabiners.
If weights shift, place them in fabric weight bags for stability.
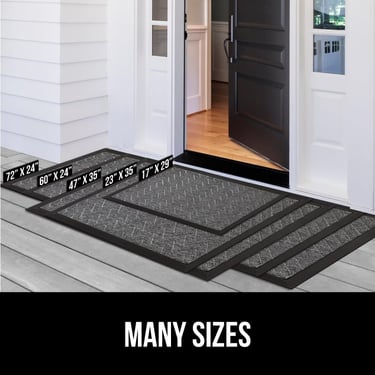

Non‑Slip Outdoor Utility Mat (for Securing Inflatables on Concrete)
1. What this product is
A heavy‑duty non‑slip outdoor utility mat made from rubberized material that grips smooth surfaces like concrete, pavers, and sealed patios. It creates friction under the inflatable’s base, preventing sliding and shifting during wind or inflation cycles.
2. Why it fits this guide
Concrete setups are tricky because there’s no soil for stakes. A non‑slip mat gives the inflatable a stable foundation, helping the fan build pressure and keeping the decoration from drifting or rotating when wind hits.
3. Who this product is best for
This mat is ideal for homeowners who:
Display inflatables on driveways, patios, or porches
Live in wind‑exposed neighborhoods
Use tall or narrow‑base inflatables
Need a non‑permanent anchoring solution (renters, HOA restrictions)
4. Why it was selected
Rubber mats provide instant friction, work in all climates, and don’t damage surfaces. They’re reusable, easy to store, and compatible with weight bags and tether systems.
5. Problems it solves
Prevents inflatables from sliding on smooth surfaces
Helps stabilize the base during inflation
Reduces wobbling caused by wind gusts
Protects the inflatable from abrasion on rough concrete
Improves overall anchoring effectiveness when combined with weights
6. Limitations
Does not anchor the inflatable by itself
Can retain water in heavy rain if not elevated slightly
May shift under extreme wind without added weight
Needs occasional cleaning to maintain grip
7. Discovery Fingerprint
Search terms that reliably surface this type of product:
“non slip outdoor utility mat,” “rubber traction mat for patio,” “anti‑slip mat for concrete surfaces.”
7. How to Fix Inflatables After Rain
Why rain causes problems
Rain affects inflatables in two ways: added weight on the fabric and moisture inside the fan or intake. Even a thin layer of water can weigh down large surfaces, causing sagging or slow inflation. In colder climates, moisture can freeze overnight, making the inflatable stiff and heavy the next morning.
Core recovery steps
Unplug immediately to protect the fan motor.
Lift and shake off pooled water from the top surfaces.
Dry the intake area with a towel so the fan can pull air freely.
Open zippers to allow trapped moisture to escape.
Use a hair dryer on low heat to warm and dry stubborn wet spots.
Let the inflatable air‑dry for 1–2 hours before reinflating fully.
Real‑world example A homeowner in the Pacific Northwest found their giant penguin inflatable collapsing after a night of heavy rain. The fan was fine—the issue was a water‑soaked hat weighing down the top. After towel‑drying and warming the fabric, the inflatable stood tall again.
For seasonal issues like weak blowers or springtime wear, check out How to Fix Spring Inflatables: Quick Repairs for Holes, Seams & Weak Blowers.
Troubleshooting
If the inflatable inflates slowly, check for wet internal air channels.
If the fan sputters, moisture may be inside the housing—let it dry completely before use.
If the inflatable leans, water may still be pooled in folds—lift and shake again.
8. How to Clean Inflatable Decorations
Why cleaning matters
Dirt, pollen, mold, and soot build up over the season. This not only dulls colors but also weakens fabric over time. In humid regions, mold can form quickly on damp surfaces, while dry, dusty climates leave a fine grit that clogs fans.
Safe cleaning method
Mix mild dish soap with warm water.
Use a soft cloth or sponge—never abrasive pads.
Wipe gently in circular motions.
Rinse with a damp cloth (no hose pressure).
Allow to air‑dry fully before storing or inflating.
Mini example A homeowner in Arizona noticed their inflatables looked faded. It wasn’t sun damage—it was dust. A simple soap‑and‑water wipe restored the bright colors instantly.
Troubleshooting
If stains persist, use a fabric‑safe cleaner—avoid bleach.
If mold appears, clean with vinegar + water, then rinse thoroughly.
If the inflatable smells musty, open all zippers and let it sun‑dry for a few hours.
9. How to Store Inflatables Properly
Why storage matters
Most long‑term damage happens after the holidays—when inflatables are packed away damp, folded incorrectly, or stored in fluctuating temperatures. Proper storage extends the life of the fabric, LEDs, and fan.
Best storage practices
Clean and dry completely before packing.
Fold loosely, following natural seams.
Place in a breathable storage bag—avoid airtight bins if moisture is present.
Store in a cool, dry place away from direct heat.
Keep fans and adapters in labeled bags to prevent cord tangles.
Real‑world example A homeowner in New England stored inflatables in a cold garage without drying them first. By spring, mold had spread across the fabric. After switching to indoor closet storage with breathable bags, the issue never returned.
Troubleshooting
If the inflatable smells musty after storage, air it out in sunlight for 1–2 hours.
If creases are deep, warm the fabric gently with a hair dryer before inflating.
If LEDs flicker after storage, check for loose connectors inside the inflatable.
Breathable Storage Bags (for Long‑Term Inflatable Storage)
1. What this product is
A breathable, fabric‑based storage bag designed to protect inflatables from dust, moisture, and temperature swings. These bags allow airflow while keeping the fabric clean and preventing mold growth—something airtight plastic bins often fail to do.
2. Why it fits this guide
Most inflatable damage happens after the holidays when decorations are packed away damp or compressed. Breathable bags prevent trapped moisture, reduce mildew risk, and keep the fabric flexible for the next season.
3. Who this product is best for
These bags are ideal for homeowners who:
Store inflatables in basements, garages, or closets
Live in humid climates where mold is common
Want to avoid creases and fabric stress
Prefer a lightweight, easy‑to‑carry storage option
4. Why it was selected
Breathable bags strike the right balance between protection and ventilation. They prevent dust buildup, allow moisture to escape, and reduce the risk of fabric sticking or discoloration during long storage periods.
5. Problems it solves
Prevents mold and mildew
Reduces deep creases from tight folding
Keeps inflatables clean and dust‑free
Protects printed graphics from abrasion
Extends the lifespan of older decorations
6. Limitations
Not waterproof—should not be placed directly on damp floors
Requires inflatables to be fully dry before packing
May not fit extremely large inflatables without folding
Offers less rigid protection than plastic bins
7. Discovery Fingerprint
Search terms that reliably surface this type of product:
“breathable storage bag large,” “fabric storage bag for decorations,” “ventilated holiday storage bag.”
10. How to Fix LED Lights Inside Inflatables
Why LED issues happen
LED failures usually come from loose connectors, broken internal wiring, or moisture exposure. Because LEDs run cool and use little power, they rarely “burn out”—the problem is almost always a connection issue. Cold climates can stiffen wires, while humid regions increase corrosion risk.
Core repair steps
Unplug and deflate the inflatable fully.
Locate the internal LED strip or bulb housing—usually accessible through a zipper.
Check for loose plug‑in connectors and push them firmly together.
Inspect wires for pinches or bends caused by folding or storage.
If an LED module is removable, test it by plugging it into another connector inside the inflatable.
Dry any moisture with a towel or low‑heat hair dryer.
Mini example A homeowner in Florida found their snowman glowing only on one side. The issue wasn’t the LEDs—it was a loose connector hidden behind the internal air channel. Reconnecting it restored full brightness instantly.
Troubleshooting
If LEDs flicker, check for partial connector engagement.
If only one LED is out, the module may be replaceable—most modern inflatables use modular LED pods.
If the entire lighting system is dark, test the power adapter before assuming internal failure.
If LEDs dim after rain, moisture is likely inside—dry thoroughly before reinflating.

Replacement LED Pod / LED Strip Kit (for Fixing Internal Lights)
1. What this product is
A modular replacement LED pod or LED strip kit designed specifically for holiday inflatables. These units plug directly into the existing internal wiring harness and provide bright, low‑heat illumination that matches the original lighting system.
2. Why it fits this guide
Most LED failures inside inflatables come from loose connectors or damaged LED pods, not burned‑out bulbs. Modular LED replacements restore full brightness quickly and safely without requiring rewiring or fabric cutting.
3. Who this product is best for
This kit is ideal for homeowners who:
Have dim or flickering LEDs
Notice one section of the inflatable is dark
Store inflatables in ways that may pinch wiring
Want to extend the life of older decorations
Prefer a plug‑and‑play lighting fix
4. Why it was selected
Modular LED pods are the most compatible and reliable option for modern inflatables. They run cool, use minimal power, and are designed to withstand outdoor moisture and temperature swings. They also match the brightness and color temperature of most factory lighting.
5. Problems it solves
Restores full internal brightness
Fixes flickering or intermittent lighting
Replaces damaged LED pods without replacing the entire inflatable
Improves nighttime visibility
Helps diagnose wiring issues by testing pod‑to‑pod compatibility
6. Limitations
Must match the connector type used by your inflatable
Not compatible with older incandescent‑based inflatables
Requires access to internal zipper openings
Will not fix broken wiring harnesses (rare but possible)
7. Discovery Fingerprint
Search terms that reliably surface this type of product:
“replacement LED pod for inflatables,” “inflatable LED light kit,” “modular LED strip holiday inflatable.”
11. How to Fix Seams, Tears & Holes
Why seams fail
Seams take the most stress—especially around curves, arms, hats, and accessories. Temperature swings cause fabric expansion and contraction, which weakens stitching over time. Tears from pets, branches, or sharp ice edges are also common.
Repairing seams
Clean the area with mild soap and water.
Apply fabric adhesive along the seam line.
Press the seam together and hold for 1–2 minutes.
Reinforce with a fabric patch on the inside if accessible.
Allow to cure for several hours before inflating.
Repairing tears & holes
For small holes: use a vinyl patch kit or clear outdoor tape.
For long tears: apply a large fabric patch that extends at least 1" beyond the tear.
For curved areas: cut patches into rounded shapes to prevent peeling.
For high‑stress zones: reinforce with two patches—one inside, one outside.
Real‑world example A homeowner in Colorado discovered a 4" tear in their inflatable dragon after a windstorm pushed it into a rose bush. A double‑patch repair (inside + outside) restored full pressure and held up through the rest of the season.
Troubleshooting
If a patch won’t stick, the surface may still be damp—dry thoroughly.
If the inflatable still sags, check for secondary micro‑tears.
If a seam continues to split, apply seam tape along the entire length for reinforcement.
If the tear is near the fan intake, ensure the patch doesn’t restrict airflow.
Large Fabric Patch Kit (for Bigger Tears & High‑Stress Repairs)
1. What this product is
A large‑format fabric patch kit containing oversized patches made from flexible, outdoor‑rated material. These patches are designed for repairing long tears, curved surfaces, and high‑stress areas where small vinyl patches fail.
2. Why it fits this guide
Some inflatable damage—especially tears over 3–4 inches—requires broad coverage to distribute pressure evenly. Large fabric patches provide the surface area needed to prevent peeling and maintain airtight integrity.
3. Who this product is best for
This kit is ideal for homeowners dealing with:
Long tears (4–10 inches)
Wind‑related damage
Pet‑caused rips
Tears near high‑stress zones like arms, hats, wings, or accessories
Older inflatables with thinning fabric
4. Why it was selected
Large patches offer maximum adhesion area, making them far more reliable for big repairs. They can be cut into custom shapes, rounded for curved surfaces, and paired with adhesive for double‑sided reinforcement.
5. Problems it solves
Repairs long or irregular tears
Prevents further splitting under pressure
Works on curved or complex shapes
Provides strong reinforcement for older fabric
Creates a smooth, durable seal that blends well
6. Limitations
Requires careful trimming for curved areas
Works best when paired with fabric adhesive
Adds slight stiffness to the repaired area
Must be applied to a fully dry surface
7. Discovery Fingerprint
Search terms that reliably surface this type of product:
“large fabric repair patch outdoor,” “heavy duty nylon patch kit,” “big tear repair patch for inflatables.”
For creative ways to extend the life of older inflatables, explore Innovative Repair and Upcycling Methods for Inflatables.
Related Articles:
Looking for more detailed information on specific issues? Please check my detailed articles below:
How to Fix Spring Inflatables: Quick Repairs for Holes, Seams and Weak Blowers
Inflatable Halloween Repair Guide: Top Products and Techniques
How to Fix Seams, Tears & Holes in Holiday Inflatables (Beginner to Pro Repairs)
Best Practice Tips to Repair Your Inflatable Decorations