How to Store Inflatables Properly: A Complete, All- Season Guide
Learn how to clean, dry, pack, and store holiday inflatables the right way so they last longer in any climate. Practical steps, real world tips, and storage solutions included.
By Frank “Frosty” Adminei
3/17/202617 min read
Properly storing holiday inflatables starts with thorough cleaning and drying, followed by packing each item in a labeled, protective container suited for your climate. Choose a cool, dry storage location, perform quick maintenance checks before packing away, and use consistent labeling so you can easily find each inflatable next season.
Overview
This guide walks you through the full, step‑by‑step process of storing inflatable decorations so they last for years. You’ll learn how to clean and dry them correctly, choose the right containers, prevent mold and cracking in different climates, organize storage for fast setup next season, and apply real‑world best practices from homeowners who use inflatables year‑round. Written in Frank “Frosty” Adminei’s practical, friendly tone, this article is tailored for InflatableHoliday.com readers who want long‑term durability and stress‑free storage.
Introduction
Storing your inflatables the right way is one of the easiest ways to extend their life and avoid costly mid‑season surprises. A little care now—cleaning, drying, folding, and choosing the right containers—keeps fabric strong, blowers running smoothly, and colors bright year after year. Whether you’re packing away a small porch snowman or a 12‑foot Santa that anchors your whole display, the same principles apply.
Different climates add their own challenges. Humid regions demand extra moisture control, cold climates can make vinyl brittle, and hot attics can warp fabric if you’re not careful. In this guide, I’ll walk you through the exact steps I use and the lessons I’ve learned from homeowners across the country. From cleaning and drying to labeling and long‑term storage, you’ll get a clear, season‑proof system that makes next year’s setup faster and stress‑free. And when it helps, I’ll point out a few tools—like a good airtight bin—that make the job even easier.
1. Why Proper Storage Matters for Long‑Term Inflatable Life
Why storage makes or breaks inflatable lifespan
Proper storage is the single biggest factor in how long your inflatables last. Even high‑quality fabrics and blowers can deteriorate quickly if they’re packed away damp, exposed to temperature swings, or stored in the wrong type of container. A little prep now saves you from cracked vinyl, moldy seams, and blower failures next season.
How poor storage causes damage
Moisture trapped inside an inflatable leads to mold, mildew, and odor—all of which weaken the fabric over time. Extreme heat (like an attic in July) can cause vinyl to warp or stick, while freezing temperatures can make seams brittle. Rodents and insects also love warm, soft materials, so unprotected inflatables can become nesting material.
Real‑world example
A reader from Minnesota shared that her inflatable Santa lasted only two seasons because she stored it in an uninsulated shed. The blower rusted, the fabric cracked, and the zipper failed. After switching to climate‑aware storage and proper containers, her replacements have lasted five years and counting.
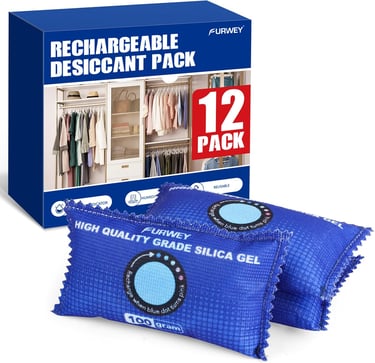
Moisture Control Packets
1. What this product solves
Moisture control packets help prevent mold, mildew, and odor inside storage containers—especially important for humid or coastal climates.
2. Why it matters for inflatables
Inflatable fabric absorbs moisture easily. These packets keep the environment dry without adding heat or chemicals.
3. Key features to look for
Rechargeable or replaceable packets
Non‑toxic materials
Indicator windows showing saturation
Suitable for sealed bins
4. How to use it correctly
Place one or two packets inside each storage bin. Replace or recharge them every 3–6 months depending on climate.
5. Frosty’s tip
I keep a small calendar reminder to “recharge desiccants” every spring. It takes five minutes and saves a ton of headaches.
6. Who benefits most
Homeowners in humid, coastal, or basement‑storage environments.
2. Pre‑Storage Cleaning: Removing Dirt, Debris, and Seasonal Grime
Why cleaning matters before storage
Inflatables pick up dirt, pollen, leaves, and road dust throughout the season. If you pack them away dirty, that grime can stain the fabric, attract pests, or cause abrasion damage during storage. A clean inflatable is far less likely to develop mold or discoloration.
Safe cleaning methods
Use mild soap, warm water, and a soft cloth or sponge. Avoid harsh chemicals—they can strip protective coatings or weaken seams. For stubborn spots, a soft‑bristle brush works well, but go gently around printed graphics and stitched areas.
Blower and electrical component care
Never submerge the blower or allow water to enter the housing. Wipe it down with a damp cloth and let it air‑dry completely. Check the power cord for nicks or fraying, and inspect the intake screen for debris.
Mini example
If your inflatable sat near a tree, sap may have collected on the surface. A little warm water and dish soap usually removes it. Avoid alcohol‑based cleaners—they can cause fading.
Gentle Outdoor Fabric Cleaner
1. What this product solves
Removes dirt, pollen, and grime without damaging inflatable fabric or printed graphics.
2. Why it matters for inflatables
Inflatable materials are sensitive to harsh chemicals. A gentle cleaner preserves color and prevents premature wear.
3. Key features to look for
Non‑abrasive formula
Safe for vinyl and polyester
Spray‑on application
Residue‑free finish
4. How to use it correctly
Spray lightly, wipe with a soft cloth, and rinse with clean water. Allow the inflatable to fully dry before folding.
5. Frosty’s tip
I keep a dedicated “inflatable cleaning kit” so I’m not hunting for supplies at the end of the season.
6. Who benefits most
Anyone with large inflatables or those displayed near trees, roads, or dusty areas.

3. Drying Inflatables Thoroughly to Prevent Mold and Odor
Why drying matters
Even a small amount of trapped moisture can lead to mold, mildew, and fabric breakdown during storage. Inflatables often hold water in seams, folds, and internal chambers, so drying isn’t just a quick wipe—it’s a process. Proper drying ensures the fabric stays flexible and odor‑free for next season.
Drying methods that work in any climate
In dry climates, air‑drying outdoors works well. In humid or coastal regions, you may need to bring the inflatable inside to finish drying with fans or dehumidifiers. For cold climates, avoid drying outdoors in freezing temperatures—ice crystals can weaken the material.
How to check for hidden moisture
Run your hand along seams, zipper areas, and internal folds. If the inflatable feels cool to the touch, it may still be damp. Pay special attention to areas around the blower intake and any stitched graphics.
Mini example
A homeowner in Florida shared that her inflatables kept developing a musty smell. The culprit? Moisture trapped in the lower belly of a large reindeer inflatable. After switching to a fan‑assisted indoor dry, the issue disappeared.
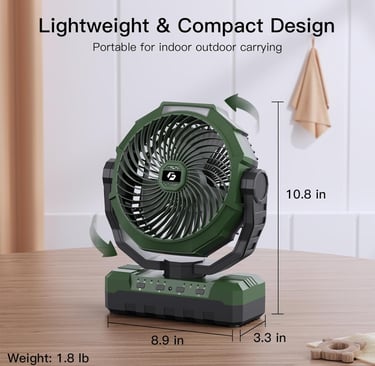
Portable Drying Fan
1. What this product solves
Portable fan provides steady airflow to dry inflatables quickly, especially in humid or cold climates where air‑drying is slow.
2. Why it matters for inflatables
Faster drying reduces the risk of mold and prevents moisture from settling into seams or printed graphics.
3. Key features to look for
Adjustable airflow
Low‑heat or no‑heat settings
Compact size for indoor use
Quiet operation
4. How to use it correctly
Set the inflatable on a clean surface and aim the fan at the thickest sections. Rotate the inflatable every 20–30 minutes for even drying.
5. Frosty’s tip
I use a small fan in my garage during rainy weeks—it cuts drying time in half.
6. Who benefits most
Homeowners in humid, coastal, or rainy regions.

Climate‑Aware Drying Tips
Cold climates
Dry indoors to avoid freezing fabric. Use a fan or place the inflatable in a warm room.
Humid climates
Pair a fan with a dehumidifier. Rotate the inflatable more frequently.
Coastal climates
Salt air can leave residue—rinse lightly before drying to prevent stiffness.
4. Climate‑Specific Storage Considerations (Cold, Humid, Hot, Coastal)
Why climate matters for storage
Inflatables react differently depending on where you live. Heat can warp vinyl, cold can make seams brittle, and humidity can cause mold even in sealed containers. Understanding your climate helps you choose the right storage location and container type.
Cold climates
Freezing temperatures can stiffen fabric and weaken seams. Store inflatables in a temperature‑stable area like a basement or interior closet. Avoid unheated garages or sheds.
Humid climates
Moisture is the enemy. Use airtight bins, moisture absorbers, and avoid basements unless they’re dehumidified. Check bins mid‑summer for condensation.
Hot climates
Attics can reach 120°F or more, which can warp vinyl and fade printed graphics. Choose cooler spaces like closets or climate‑controlled storage rooms.
Coastal climates
Salt air accelerates corrosion on blowers and zippers. Rinse inflatables lightly before drying and use sealed containers with desiccants.
Real‑world example
A homeowner in Texas stored inflatables in an attic for years without issue—until a heatwave caused two of them to fuse together. Moving them to a closet solved the problem.
5. Inspecting and Maintaining Inflatables Before Packing Away
Why pre‑storage maintenance matters
A quick inspection before storage prevents small issues from becoming major repairs next season. Seams, zippers, blower housings, and tether points all take stress during the holidays. Catching wear early keeps your inflatables display‑ready and reduces the chance of mid‑season failures.
What to inspect
Look for loose stitching, small tears, worn tether loops, and cracked plastic on blower housings. Check the zipper for smooth operation and ensure the intake screen is free of debris. Light strands inside some inflatables can shift or loosen—make sure they’re secure.
Electrical component check
Inspect the power cord for fraying and test the blower briefly before storage. If the blower sounds strained or rattles, it may need lubrication or replacement. A quick test now saves you from discovering a dead blower the night you plan to set up your display.
Mini example
One InflatableHoliday.com reader found a tiny seam tear on a snowman’s arm during his end‑of‑season check. A simple patch fixed it in minutes—if he’d stored it without noticing, the tear would have doubled by next year.
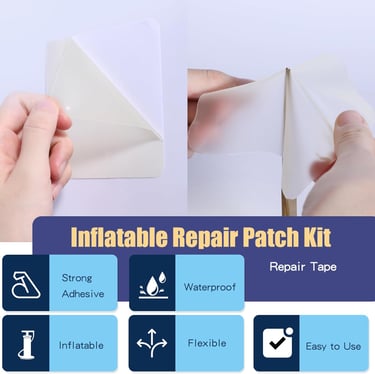
Inflatable Repair Patch Kit
1. What this product solves
Patch kit fixes small tears, seam splits, and punctures before they worsen during storage.
2. Why it matters for inflatables
A minor tear stored under pressure can expand, especially in hot or humid climates.
3. Key features to look for
Clear vinyl patches
Strong adhesive
Flexible material
Weather‑resistant bonding
4. How to use it correctly
Clean the area, ensure it’s fully dry, apply the patch, and press firmly for 30–60 seconds. Let it cure before folding.
5. Frosty’s tip
I keep a patch kit in my “inflatable toolbox” so I can fix issues immediately instead of forgetting.
6. Who benefits most
Anyone with large inflatables or older decorations with worn seams.

Blower Intake Cleaning Brush
1. What this product solves
Removes dust, leaves, and debris from blower intake screens to maintain airflow.
2. Why it matters for inflatables
A clogged intake forces the blower to work harder, shortening its lifespan.
3. Key features to look for
Soft bristles
Narrow profile
Anti‑static material
Comfortable grip
4. How to use it correctly
Brush gently across the intake screen and around the housing. Avoid pushing debris deeper into the blower.
5. Frosty’s tip
A quick brush‑out before storage keeps blowers running quietly next season.
6. Who benefits most
Anyone storing inflatables used near trees, mulch beds, or dusty roads.
6. Choosing the Right Storage Containers (Bins, Bags, Specialty Options)
Why container choice matters
The right container protects your inflatables from moisture, pests, and temperature swings. A poor container can trap humidity, allow rodents inside, or warp under heat. Choosing wisely ensures your inflatables stay clean, dry, and ready for next season.
Types of containers
Rigid plastic bins offer the best protection and stack well in garages or closets. Soft storage bags work for smaller inflatables but offer less pest resistance. Gasket‑sealed bins are ideal for humid climates, while opaque bins help reduce heat exposure in hot regions.
What size to choose
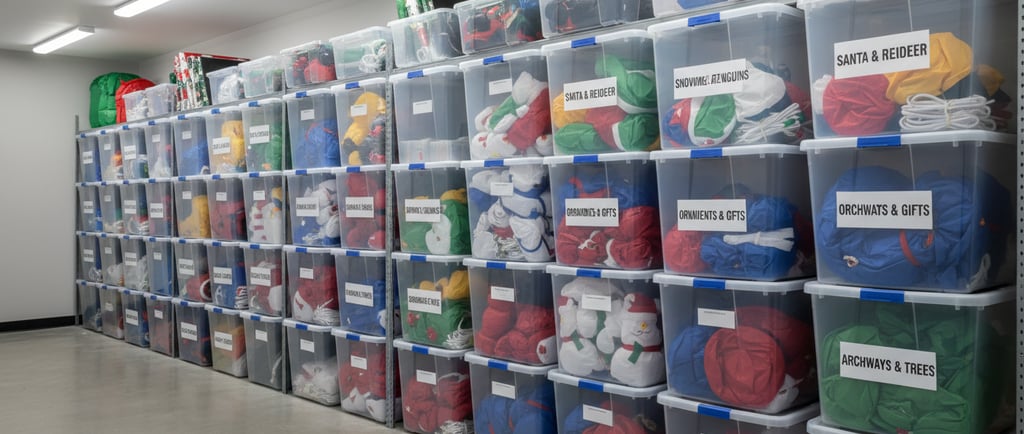
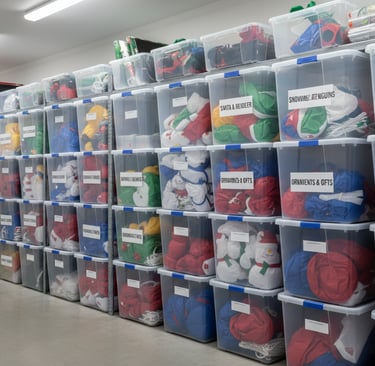
Oversized bins prevent tight folding that stresses seams. For large inflatables, consider using two bins—one for the inflatable and one for accessories. Labeling each bin makes next year’s setup faster.
Mini example
A reader in Georgia switched from soft bags to gasket‑sealed bins after discovering condensation inside her old containers. The new bins kept everything dry through a humid summer.
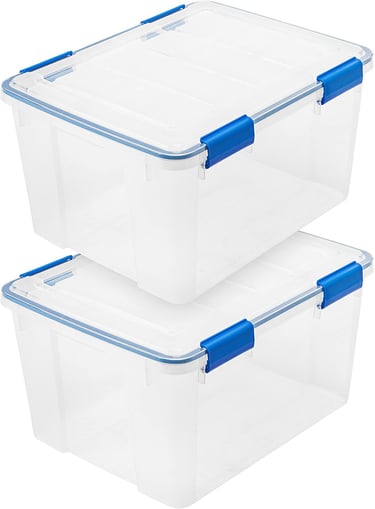
Gasket‑Sealed Storage Bin
1. What this product solves
Gasket-sealed bins provide airtight, moisture‑resistant storage ideal for humid or coastal climates.
2. Why it matters for inflatables
Prevents mold, pests, and heat‑related warping.
3. Key features to look for
Rubber gasket seal
Locking latches
Stackable design
Opaque walls for heat reduction
4. How to use it correctly
Place the fully dried inflatable inside, add moisture absorbers if needed, and latch securely.
5. Frosty’s tip
I use color‑coded bins—blue for winter inflatables, red for Christmas characters, green for trees and wreaths.
6. Who benefits most
Homeowners in humid, coastal, or pest‑prone areas.
How to choose the right bin for your inflatable
1. Measure the inflatable’s “folded footprint”
After folding along natural seams, measure the approximate rectangle it forms. Choose a bin that gives 1–2 inches of clearance on all sides.
2. Consider blower size
Large inflatables often have large blowers. Storing blowers separately reduces weight and prevents cord kinking.
3. Think about climate
Humid climates: prioritize gasket‑sealed bins
Hot climates: choose opaque bins to reduce heat exposure
Cold climates: avoid thin plastic bins that can crack
4. Don’t overfill
If the lid bulges, the bin is too small. Over‑compression leads to seam stress and fabric memory.
Frosty’s quick tips
I use color‑coded bins by holiday and size‑coded bins by inflatable height.
If you’re unsure between two sizes, choose the larger bin—airflow and space prevent creasing.
7. Folding and Rolling Techniques That Prevent Creases and Damage
Why folding technique matters
Inflatables aren’t just big pieces of fabric—they’re shaped structures with seams, printed graphics, and internal stitching that can weaken if folded incorrectly. A good folding method prevents stress points, reduces creasing, and keeps the inflatable looking crisp next season.
How to fold without stressing seams
Lay the inflatable flat and smooth out any wrinkles. Fold along natural seams rather than against them. For large inflatables, fold in thirds instead of halves to distribute pressure more evenly. Keep blower cords tucked inside the first fold so they don’t snag or bend sharply.
Rolling vs. folding
Rolling works well for inflatables with long, tubular shapes (like arches or tall characters). Folding is better for wide, flat designs. The key is avoiding tight compression—leave a little air inside so the fabric doesn’t crease sharply.
Mini example
A reader with a 12‑foot Santa found that rolling the torso and folding the legs separately prevented the deep creases he used to see each year.
8. Labeling Containers for Fast Setup Next Season
Why labeling matters
A clear labeling system saves time and prevents frustration when the next holiday season rolls around. Instead of digging through bins to find the right inflatable, you’ll know exactly where everything is. Good labeling also helps you track accessories, blowers, and replacement parts.
Labeling methods that work
Use large, easy‑to‑read labels on two sides of each bin. Color‑coding helps if you have a large collection—red for Christmas, orange for Halloween, blue for winter themes. For tech‑savvy homeowners, QR codes linked to a simple inventory list make retrieval even faster.
What to include on each label
List the inflatable name, size, accessories included, and any notes about repairs or missing parts. If you store blowers separately, note which bin contains the matching blower.
Mini example
One InflatableHoliday.com reader uses laminated cards attached with zip ties. They last for years and don’t peel off in humid climates.
9. Best Storage Locations (Garage, Basement, Shed, Attic, Closet)
Why location matters
Even the best containers can only do so much if the storage environment works against you. Temperature swings, humidity, pests, and accessibility all influence how well your inflatables hold up over the off‑season. Choosing the right location prevents fabric warping, mold growth, and blower corrosion.
Garage storage
Garages work well if they stay relatively dry and don’t experience extreme heat. Keep bins off the floor to avoid moisture wicking and rodent access. Shelving helps maintain airflow around containers.
Basement storage
Basements are great for temperature stability but can be humid. Use gasket‑sealed bins and moisture absorbers. Avoid placing bins directly against concrete walls, which can sweat during seasonal changes.
Shed storage
Sheds are convenient but risky. Heat, cold, and pests are common issues. Only store inflatables in a shed if you use airtight containers and add pest deterrents.
Attic storage
Attics often reach extreme temperatures—120°F+ in summer and freezing in winter. This can warp vinyl and weaken seams. Only use an attic if it’s insulated and climate‑controlled.
Closet storage
Indoor closets are ideal: stable temperature, low humidity, and minimal pest risk. The only downside is space, so this option works best for smaller collections.
Mini example
A reader in North Carolina moved her inflatables from a shed to a hallway closet after discovering mice had chewed through a tether loop. Since switching locations, she hasn’t had a single issue.
10. Protecting Inflatables from Pests, Moisture, and Temperature Swings
Why protection matters
Even with good containers and a solid storage location, inflatables still face risks from pests, humidity, and extreme temperatures. A few simple precautions can prevent rodent damage, mold growth, and fabric warping.
Pest prevention
Rodents love warm, soft materials. Keep bins sealed, avoid storing near food sources, and consider natural deterrents like peppermint sachets. Check bins periodically for chew marks or droppings.
Moisture control
Humidity can creep into even well‑sealed containers. Use moisture absorbers and avoid storing bins directly on concrete floors. If you live in a coastal or humid region, check bins mid‑summer for condensation.
Temperature management
Avoid storing inflatables in areas with extreme heat or cold. If you must use a garage or shed, insulate the storage area or use double‑walled bins to buffer temperature swings.
Mini example
A homeowner in Maine added a simple foam board barrier under her bins to prevent cold transfer from the concrete floor. Her inflatables stayed more flexible and showed fewer crease marks the next season.
11. Storing Accessories: Stakes, Tethers, Blowers, and Replacement Bulbs
Why accessories need their own system
Accessories are the first things to get lost, tangled, or damaged during storage. Stakes rust, tethers knot, and blowers get tossed into random bins. A dedicated accessory system keeps everything together and makes next season’s setup dramatically faster.
How to organize accessories
Group items by type: stakes in one bag, tethers in another, and blower units stored separately. Use small containers or zippered pouches to keep replacement bulbs and fuses from scattering. Label each pouch clearly so you can match accessories to the correct inflatable.
Blower storage tips
Blowers should be stored in dry, temperature‑stable locations. Wrap cords loosely to avoid kinks and check the intake screen one last time before packing away. If you have multiple blowers, label them with the inflatable name or bin number.
Mini example
A reader with a large Halloween display stores all stakes and tethers in a single orange bin. When October rolls around, he grabs that one bin and knows everything he needs is inside.
12. Off‑Season Quick Checks (Spring, Summer, Early Fall)
Why mid‑year checks matter
Even when stored properly, inflatables can shift, absorb moisture, or experience temperature‑related stress over time. A quick check once or twice during the off‑season helps catch issues early and prevents surprises when the holidays return.
What to check during each season
In spring, look for condensation inside bins and ensure labels are still intact. In summer, check for heat‑related warping or sticky vinyl if bins are stored in warm areas. In early fall, confirm that accessories are still organized and that blowers haven’t developed rust or odor.
How to perform a quick inspection
Open each bin briefly and check for moisture, pests, or unusual smells. You don’t need to unpack everything—just a quick visual and scent check is enough. If you spot issues, address them immediately rather than waiting until setup season.
Mini example
A homeowner in Louisiana discovered slight mildew in one bin during a July check. Because she caught it early, she cleaned and dried the inflatable before the mold spread.
13. Troubleshooting Common Storage Problems
Why troubleshooting matters
Even with great storage habits, inflatables can develop issues over time. Temperature swings, humidity, pests, and simple fabric aging can all cause problems. Knowing how to diagnose issues early helps you avoid costly replacements and keeps your display running smoothly year after year.
Common problems and how to fix them
Mold or mildew usually means moisture was trapped during storage. Clean with mild soap and warm water, then fully dry before repacking.
Cracking or stiffness often comes from heat exposure—especially attic storage. Warm the inflatable gently indoors before unfolding.
Blower issues may stem from dust buildup or motor fatigue. Clean the intake screen and test the blower before reinstalling.
Rodent damage shows up as chewed cords or fabric. Patch small holes and replace damaged cords immediately.
Mini example
A homeowner in Ohio found that her inflatable penguin wouldn’t stand upright after storage. The culprit? A small tear near the base seam. A quick patch fixed the issue, and the penguin was back in action by December.
14. Real‑World Scenarios and Lessons Learned from Homeowners
Why real‑world examples matter
Every home, climate, and storage setup is different. Learning from other inflatable owners helps you avoid mistakes and adopt strategies that actually work in the real world. These scenarios highlight what goes right—and what can go wrong—when storing inflatables.
Cold‑climate lessons
A homeowner in Minnesota stored her inflatables in an unheated garage. After two winters, she noticed cracking around the seams. Moving them to a basement closet solved the issue and extended the life of her collection.
Humid‑climate lessons
A family in Florida struggled with mildew until they switched to gasket‑sealed bins with desiccants. They also started doing mid‑summer checks, which prevented mold from spreading.
Hot‑climate lessons
A Texas homeowner stored inflatables in an attic that reached extreme temperatures. Two inflatables fused together. After relocating them to a guest‑room closet, the problem never returned.
Coastal‑climate lessons
A reader in California found that salt air caused zipper corrosion. Rinsing inflatables before drying and using airtight bins kept the issue under control.
Mini example
One InflatableHoliday.com reader created a “seasonal rotation system,” checking bins every spring and summer. This simple habit caught issues early and kept her collection in great shape.
15. Frosty’s Best‑Practice Tips for Stress‑Free Storage
Why these tips matter
After years of working with inflatables, I’ve learned that small habits make the biggest difference. These best‑practice tips help you avoid the most common storage mistakes and keep your inflatables looking great season after season.
Tip 1: Create a “storage day” routine
Choose one day after the holiday season to clean, dry, fold, and pack everything. A consistent routine prevents rushed packing, which is when most damage happens.
Tip 2: Keep a dedicated inflatable toolbox
Include repair patches, zip ties, spare stakes, a blower brush, and a permanent marker. Having everything in one place saves time and reduces frustration.
Tip 3: Use climate‑appropriate storage methods
If you live in a humid area, prioritize gasket‑sealed bins and moisture absorbers. In cold climates, avoid unheated garages. In hot climates, skip the attic entirely.
Tip 4: Label everything twice
Labels fall off. Writing on two sides of the bin ensures you can always identify what’s inside, no matter how it’s stacked.
Mini example
One reader told me he used to spend hours hunting for the right blower each season. After labeling blowers with the inflatable name and bin number, setup time dropped dramatically
16. Quick‑Start Checklist for Next Season’s Setup
Why a quick‑start checklist helps
When the next holiday season arrives, you don’t want to spend hours sorting through bins or discovering last‑minute issues. A simple checklist makes setup smoother, faster, and far less stressful. It also helps you spot any problems early—before your display goes live.
Step‑by‑step quick‑start process
1. Open and inspect bins
Check for moisture, odors, or signs of pests. If anything seems off, address it before unpacking.
2. Test blowers
Run each blower for a few seconds to confirm smooth operation.
3. Inspect inflatables
Look for creases, stiffness, or small tears. Warm stiff inflatables indoors before unfolding.
4. Organize accessories
Match stakes, tethers, and bulbs to the correct inflatable using your labels or QR codes.
5. Pre‑setup cleaning
Wipe down inflatables with a soft cloth to remove dust from storage.
Mini example
A reader in Colorado uses this exact checklist every November. What used to take him a full afternoon now takes less than an hour.
17. Final Thoughts: Protecting Your Investment for Years of Displays
Why long‑term care pays off
Inflatables are more than decorations—they’re part of the joy and tradition of the season. With proper cleaning, drying, folding, and storage, your inflatables can last for many years without fading, cracking, or failing when you need them most.
The value of a consistent system
A good storage system isn’t complicated. It’s simply consistent: clean before storing, dry thoroughly, use the right containers, label clearly, and choose a safe storage location. These small habits add up to big savings in time, money, and frustration.
A final word from Frosty
I’ve seen inflatables last a decade or more when cared for properly. With the tips and strategies in this guide, you’ll be able to protect your collection, simplify your setup, and enjoy a stress‑free holiday season year after year.